Handcrafted Cement Pots: A DIY Guide by Urban Thumbs Plant Marketplace
Welcome to another DIY Thursday with Urban Thumbs Plant Marketplace! Today, we're diving into the art of creating handcrafted cement pots. These stylish and durable planters are perfect for adding a modern touch to your garden or home. Whether you're a seasoned gardener or a DIY enthusiast, this project is both fun and rewarding. Let's get started!
Materials Needed
To make your own cement pots, you'll need the following materials:
- Cement mix
- Sand
- Water
- Mixing container
- Moulds (plastic containers, silicone moulds, or recycled items like yogurt cups)
- Cooking spray or oil (to prevent sticking)
- Protective gloves and mask
- Sandpaper
- Paint and sealant (optional for decoration)
Step-by-Step Guide
1. Prepare Your Moulds
Start by choosing your moulds. You can get creative with different shapes and sizes. Lightly coat the inside of each mould with cooking spray or oil to make it easier to remove the pots once they’re set.
2. Mix the Cement
In your mixing container, combine the cement mix and sand in a 1:1 ratio. Gradually add water and stir until you achieve a smooth, thick consistency, similar to pancake batter. Make sure to wear gloves and a mask to protect yourself from dust.
3. Fill the Moulds
Pour the cement mixture into your prepared moulds. Tap the moulds gently on a flat surface to remove any air bubbles and ensure the mixture is evenly distributed. If you want drainage holes in your pots, insert small pieces of straw or plastic tubing into the bottom of the moulds.
4. Let It Set
Allow the cement to set for at least 24 hours. The setting time may vary depending on the size and thickness of your pots. Keep the moulds in a cool, dry place during this time.
5. Demould the Pots
Once the cement has fully set, gently remove the pots from the moulds. If they’re stuck, you can carefully cut or peel away the mould. If you used straws or tubing for drainage holes, remove them now.
6. Sand and Smooth
Use sandpaper to smooth out any rough edges or imperfections on your pots. This step is crucial for giving your pots a polished and professional look.
7. Decorate (Optional)
If you’d like to add some personality to your pots, now’s the time to get creative. You can paint them in your favourite colours or patterns and apply a sealant to protect them from the elements.
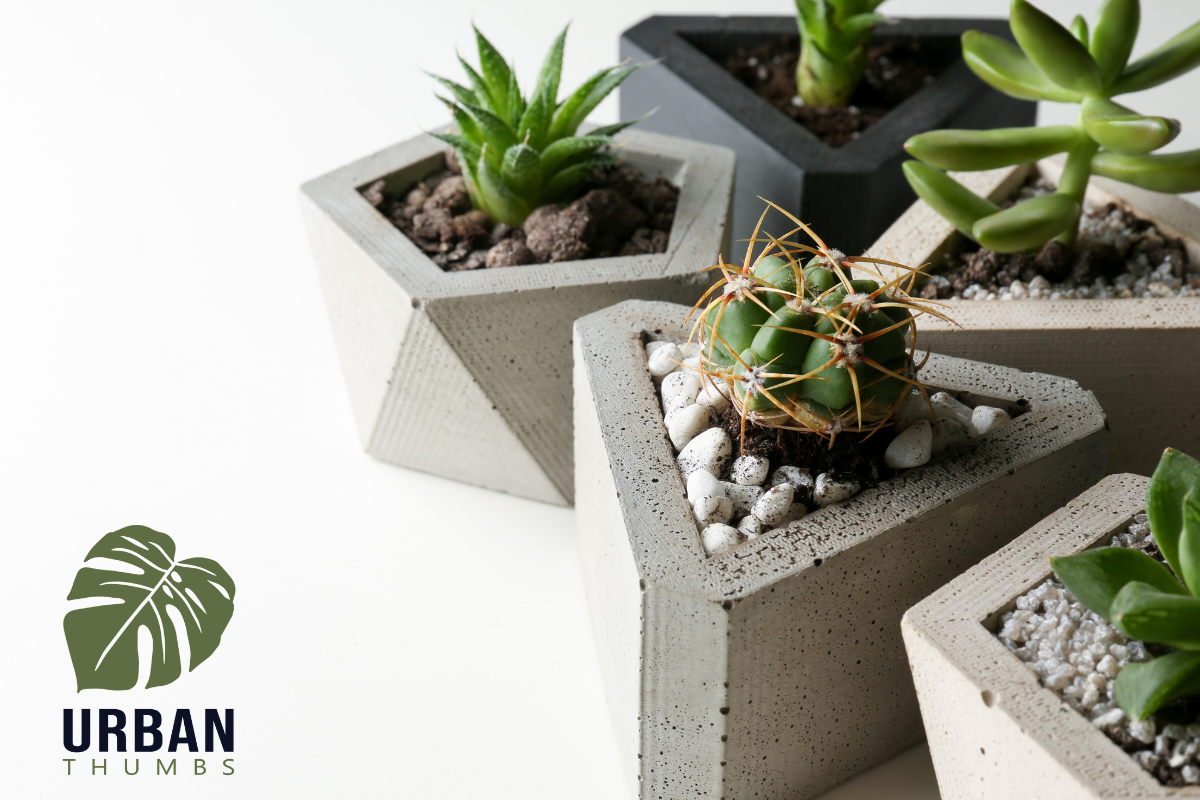
8. Plant Your Greenery
Your handcrafted cement pots are now ready to house your favourite plants! Fill them with soil and add your chosen greenery. These pots are perfect for succulents, cacti, or any other plants you love.
Tips and Tricks
- Experiment with Shapes: Use different moulds to create unique shapes and sizes.
- Add Texture: For a textured finish, you can press leaves or other patterns into the cement before it sets.
- Use Pigments: Add cement pigments to your mix to create colourful pots.
Creating handcrafted cement pots is a fantastic way to personalise your plant collection and add a touch of modern style to your space. Plus, it's a fun and satisfying project that anyone can do. We hope you enjoy making your own cement pots and feel inspired to share your creations with us on social media. Happy crafting!
For more DIY projects and gardening tips, stay tuned to Urban Thumbs Plant Marketplace. Don’t forget to check out our wide selection of plants and gardening supplies to help you on your green-thumb journey.
Happy gardening!

Leave your comment
Note: HTML is not translated!